Updating your bank details in HRMS isn’t just a routine profile edit. This single change controls where your salary, reimbursements, arrears, PF advances/withdrawals, and pension (in some cases) are credited. A small mistake—wrong IFSC, mismatched name—can delay payments for weeks.
Most HRMS platforms handle this through Employee Self Service (ESS) with an approval workflow. Here’s how to do it the right way, for both government and private-sector systems.
Before You Start (Do These Checks)
- Keep a cancelled cheque or bank passbook (first page) ready (clear scan, PDF/JPEG).
- Ensure the account holder name matches HRMS records exactly.
- Note the payroll cut-off date (often 15th–20th of the month).
- Don’t close the old account until one successful credit hits the new one.
1) Government HRMS (e-HRMS 2.0 / iHRMS)
In government portals, bank data is tied to your Service Book, so edits usually require admin approval and “freezing.”
Step-by-Step
- Log in to e-HRMS via e-Parichay.
- Go to My Profile / Employee Details.
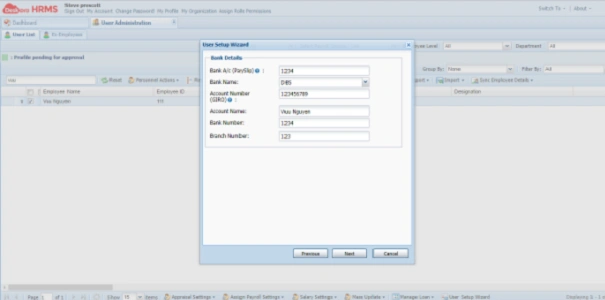
- Open Bank / Financial Details.
- Click Raise Change Request (fields are often read-only otherwise).
- Enter Account Number, Bank Name, IFSC (double-check IFSC).
- Upload proof: cancelled cheque or passbook page (≤1 MB).
- Submit the request.
What happens next:
Your request goes to the Nodal Officer / DDO. After verification, they approve and freeze the change. Only then does it reflect for payments.
Typical timeline: 2–7 working days (varies by office).
2) Private HRMS (Self-Service or Ticket-Based)
Private platforms are faster, but payroll security still applies. Common systems include Keka, greytHR, and Darwinbox.
Option A: Direct Self-Service
- Log in → Me / My Profile.
- Open Finances / Bank Details.
- Click the Edit (pencil) icon.
- Update details → Save.
- Upload proof if prompted.
Option B: Request / Helpdesk
- Go to Request Hub / Helpdesk.
- Choose Change in Bank Details.
- Enter new details, attach proof, Submit.
- HR reviews and approves.
Tip: Some companies lock edits during payroll week—try again after processing.
3) Documents That Prevent Rejection
Make sure your upload clearly shows:
- Your name (matching HRMS spelling)
- Account number
- IFSC code
- Bank/branch
Blurry images and cropped cheques are the #1 cause of rejections.
4) When Will the Change Take Effect?
- Before payroll cut-off: Usually the same month’s salary goes to the new account.
- After cut-off: Change applies next salary cycle.
Reimbursements and PF payouts follow the latest approved bank on file.
5) Common Problems & Fixes
- “Fields are locked” → Use Raise Change Request (govt) or Helpdesk (private).
- Rejected request → Check remarks; re-upload clearer proof or correct name mismatch.
- Salary credited to old account → Cut-off missed; keep old account active for one cycle.
- Wrong IFSC → Submit a fresh correction immediately.
Best Practices
- Update bank details right after opening the new account—don’t wait for month-end.
- Verify IFSC from the bank’s official site.
- Keep old account active until confirmation.
- Track request status until it shows Approved/Effective.
Final Word
Updating bank details in HRMS is simple, but it’s also high-impact. Follow the proper ESS flow, attach clean proof, respect payroll cut-offs, and track approval. Do it once—do it carefully—and your payments will keep landing exactly where they should.